We all know that WordPress is the most popular blogging platform and used by many bloggers. Installing WordPress seems a bit difficult though you can easily install WordPress too. Read on this blog post to know how to install WordPress quickly.
Those who are a regular visitor of my blog must know the fact that I always recommend WordPress over any other blogging platform like Blogger or Tumblr, etc. They all are also aware about the fact that I mostly ask bloggers to have self hosted blog and enjoy the full fledged blogging.
Although I already published a blog on how to install WordPress, but the process was a bit tedious one. The concern which I received through many mails, the process uses the creation of database which seems a bit difficult for many bloggers. To be very frank I am not saying that bloggers are not that much sound as far as technical things are concerned (as per a common blogging misconception), but yes managing database is something which can give goose bumps to many bloggers.
So to make the process short or to do the installation quickly I was trying a few new things from so many days. Today only I developed an ecommerce website and I thought that I should not go with the traditional way to install WordPress. Hence, I came up with this blog.
Here is how you can install WordPress quickly on your server:
The very basic thing which is required to install WordPress quickly is a perfect web hosting for your domain name. There are many hosting provider who do provide a direct link to install WordPress with their hosting services.
Ideally, I would recommend everyone to host their blog on HostGator. They are the best as far as any support is required for web hosting.
When you have the hosting from them you can easily install WordPress in less than 5 minutes.
Mostly web hosting providers do provide a direct link of WordPress on their Software / Services section of cPanel. You can directly click there and can install WordPress within minutes. But what if you don’t see any link to WordPress in Software / Services section of your cPanel?
Well let me tell you the way how you can install WordPress quickly over there.
You will find a button of QuickInstall in the Software / Services section of your cPanel, something like this:
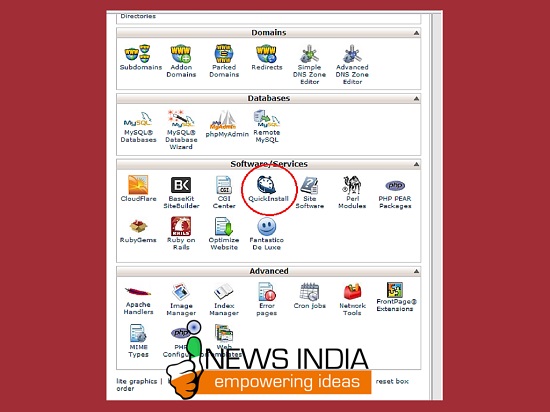
You need to click on that to start the process.
Once you click on QuickInstall, you need to locate the WordPress link on the left hand side bar of the quickinstall section.
You will get something like this:
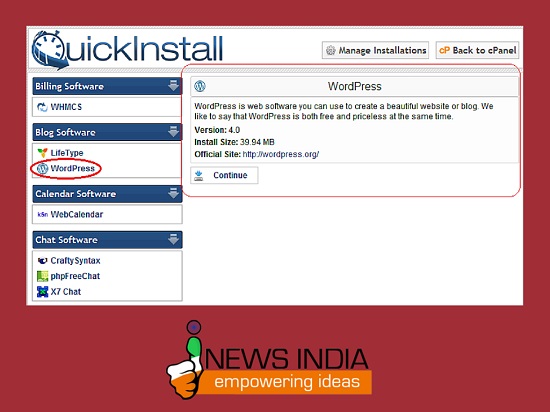
Now you need to click on Continue to begin the process.
Clicking on continue; you will get a screen of something like:
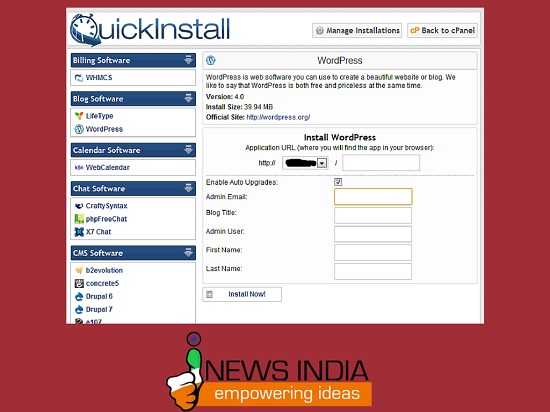
Here they will ask for the location where you want to install WordPress. You can leave the field blank after the trailing / after your domain name to install the site on the root of your site; else you can give the name of the folder where you want to install it. Just for an example if you give a name of site on that field, WordPress will install the blog at the location of http://yoursitename.com/site/
You just need to click on Enable Auto Upgrades (depending on your choices) admin Email, Title of the Blog, Admin Username, and the first and last name of the admin.
Now you can click on Install Now and you will see the progress of the installation.
Once the installation is done you will get a message like:
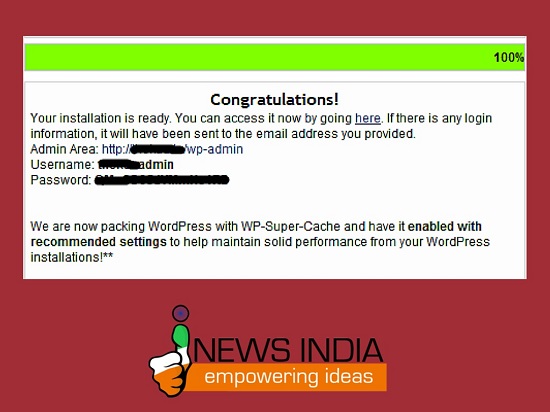
It is a clear indication that your WordPress blog is installed properly and that too hardly within 5 minutes of time frame.
This is the simplest way to install WordPress on any domain name, though it has some restrictions and precaution associate with it. Here are some things which you need to notice about it.
Mostly people will think that this installation process is actually skipping the database creation and putting them on the wp-config.php files like we did in the traditional method. Although a bit true, but to be very frank the process actually uses the database too. But the convenience is that the users need not to worry about it. The process does it automatically.
Thus it makes it easier for the users.
While you install the site with this process it does not give you the option of choosing your www domain name for installation. If you go by the process, your blog will become http://yoursitename.com/ and not http://www.yoursitename.com/ though you can easily rectify it as well.
Once the processes is over, login to your site’s admin panel and go to the General Settings options and you can give the preferred URL to rectify the issue. Depending on your preferences you can either select a www domain or you can stay with the non www domain name.
My preferences are the www domain.
I am quite sure that this blog will be useful for many of the newbie bloggers. Those who wanted to start their blogging journey, but not sure of which way to chose, can always contact me to get professional guidance. I am actually planning to start such professional blogging consultant program and I am also starting an ecommerce website which I installed today only but will announce over here very soon.
Please do share your opinion about all these things. Please do share whatever you feel about this blog post of mine or about the things which I said over here. I will be eagerly waiting for hearing your response about all these things.

Leave a Reply